Monday, October 10, 2011

The Fishes have returned!

I'm back! After having a bit of a break from blogging and just doing stuff without thinking about keeping a record of what I'm doing I have returned.
It was good to have a break and just focus on little things and to be honest I had lost my bloggy mojo for a while. Now I've had a break from it, I'm keen to continue on and get back into it.
So does anyone remember the cupboard I was going paint an eternity ago? Well it is done and is in the dining room being used. It now contains all the fishes playdough, paper, pencils, craft stuff, painting gear and other bits and pieces. It had a couple of coats of Antique White U.S.A in a semi gloss and I changed the two door knobs in the middle (they are the same ones the buffet/hutch thingy got when it was painted).
I finished quilting my three hawaiian quilts finally and they now hang above the cupboard in a row. I enjoyed doing them but was glad to have them finished as they had a lot of stitching in them. I hot glued some balsa wood to the back and hung them with those sticky velcro picture hanging things.
The darker turtle one below has been very lightly padded in the turtle bodies. It is very hard to photograph it but it has a slightly raised effect that gives it a little depth. I cut a slit in the back and poked some stuffing in then stitched them up again.
They are all raw edge appliqued and I went around the edge twice to make sure it was nice and secure.
So there you go, one painted cupboard from the tip shop all finished and put to good use. I made the runner from squares of blue and green batiks and its longer than I normally make to cover nearly the whole length.
Hope you like it! I promise to be back very soon!

Thursday, July 07, 2011

Around the Block

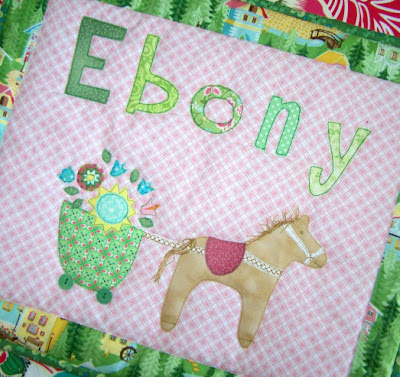
Before I get to carried away here's a squizz at a recent make for a special little girls first birthday pressie. The horse is from a pattern in the Scandinavian Stitches Book and I had to use the beautiful border fabric from the hideaway range (Lauren and Jessie Jung I think) because it is sooo lovely. She's a little small to actually have an opinion on whether she liked it or not but her mother seemed to think it was great so I'll chalk it up as a success!
I been watching the latest series of The Block on channel nine (well taping, then watching it really) and I have to say that I am liking the extra challenges and segments where they learn some new skills to use.
I would much rather see the contestants tackle some real renovation work and not just be involved in the decorating side of things, if they are getting builders in to do nearly everything then the builders might as well be the contestants. And I'm especially loving the second hand challenge though buying an ex floor stock piece of furniture is not exactly my idea of second hand. I'm liking Josh and Jenna's style the most (at the moment) as it's the closest to mine, and I was a little amused to see Polly's heart rate go up upon entering a second hand shop from being stressed. Mine does the same thing but for the opposite reason! Second hand shops are awesome! The lack of enthusiasm the contestants had for the trash to treasure challenge was a bit surprising. I know that they have $100,000 to spend transforming their little terrace houses but they would not have had that in their real life renovating to spend on whatever they fancied, so I thought they would have been a bit more familiar with using things that are not brand new. If I wanted my home to look like a furniture showroom then I would just go and live in one! It is very easy to go and buy everything brand new from a shop, but much more creativity and thought is needed to transform pre-loved pieces into something new to treasure. And really, who spends $250 dollars on one cushion! Maybe it's the sewer in me but the thought of spending that much money on a bit of material and stuffing, now that makes my heart rate go up! So producers of The Block please keep giving the contestants challenges that make them think about recycling furniture into new pieces and thinking outside the square (or block!). It's much more inspiring to viewers (me) and much more realistic in terms of budgets. And just in case one of them actually reads this and is thinking "well what did you have in mind?" (cause that is really likely to happen!)

Here's some examples-

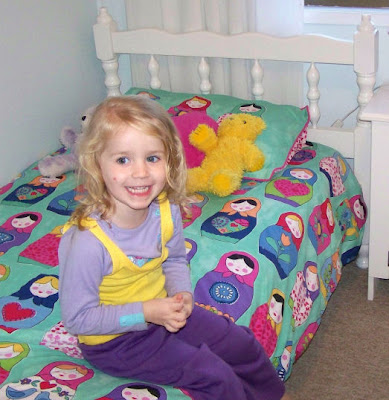
Little fishes bed is a good one. Remember it cost all of ten dollars from an op shop and after a sand and a paint with some glossy white, it looks brand new. It's solid wood and is so much lovelier than a cheap crappy bed made from chipboard or laminate. It can always be painted or sanded if someone draws on it and made to look new again so it's perfect for a kid. 
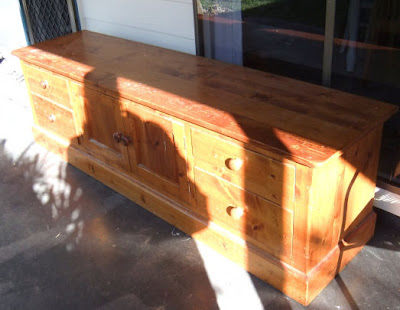
Here's another example- I recently bought a TV cabinet from the tip shop ( it's like a giant op shop) that has been turned into a low line cupboard. I wanted a low cupboard or buffet side board thingy to go in the dining room and wanted something wooden and solid to go with the other hutch thing and our table and chairs that are in there.

It was difficult to find what I was after (remembering that I'm not going to spend a fortune on a cupboard) so some clever thinking was needed. The TV cabinet was perfect, it was basically two sections that were easily separated and the bottom section became the new cupboard. (Apologies for not remembering to take a pic of the TV cabinet, you should all know I'm crap at remembering to take before shots by now)

It's solid wood (yay!) and sturdy so if a little fish climbs on it, nothing will break or collapse.

Mr fish kindly removed the top of the cabinet and made it the top of the cupboard for me (with eyes rolling of course) as it was in better condition than the piece on there and fixed a broken door insert with some panelling from the back of the unwanted section. None of this was difficult to do and we only needed some nails and a jigsaw to transform it. We broke down the remaining pieces of the cabinet and put some bits aside for disposal and kept some bigger pieces for use later on. The spare top piece that got replaced will make an excellent mobile work bench when put on a pair of saw horses.

So there you have it, a new piece of furniture made out of an unwanted one. It's being painted at the moment and then I'll show you how lovely it looks! So come on Block people, inspire me! Apologies also for the terrible photos, I forgot to take one when the light was better.

Sunday, June 26, 2011

Our Edible Garden

As well as working on our vegie patch at home we have been busy establishing one at school. We had a working bee a few weeks ago to clear out the few plants in the courtyard garden and get it ready for planting. The folks at the community garden came to give us some pointers and steer us in the right direction as we are aiming for an edible garden with a bit of permaculture thrown in.
So far everything that we've planted has grown and is looking healthy so the kids are very happy. We have some compost bins and a worm farm and have set up a garden club for the interested kids to do a bit in their lunch break. It's early days yet but the aim is to get it up and running and have the kids (and teachers) using it for lessons and making it part of their everyday school life. It's amazing how keen the littlest kids are to have a go and plant some seedlings, they have been so excited. Oldest fishes prep class have been growing things from seed as part of their science lessons and then planting them into the garden .
It's made the fishes very keen to get into the vegie patch at home and plant some seeds, so we have done a bit of maintenance work on it and have things starting to flower now. they have planted seeds, planted seedlings and watched them all grow. It's become part of their day now to go down to the patch in the afternoon and check on the plants and give them a water.
The pictures above are of the awesome mural that the students did on the wall to brighten the garden up. The grade sixes and seven designed the mural with one of our clever, artistic parents at school and then painted it on Friday. All the kids got to come out of class and do a part of it so the whole school was involved. The older kids partnered up with the smallest kids and gave them some help which was lovely to see. The older grades are really wonderful with the littlies and were so good with them.
The kids that were part of the design team stayed for the duration and saw it finished and they were so proud of themselves.
Does your local school have an edible garden or some great artwork?

Friday, June 17, 2011

Little fishes new bed.

It was decided that littlest fish needed a big girl bed. She was just growing too big for her toddler size bed and as handy as it was given her room is rather small, it was time to go. So off to the bed shops we went! And then we came home.... All the beds that we saw were made from "timber veneer" or "laminated stuff" or other rather blaghhh materials. All we wanted was a wooden bed painted white. But they don't seem to exist in our town. So then we decided to search the op shops to see if we could find an old bed to fix up and, lo and behold we found one! At the second place we went to there was an old timber bed that looked to be pretty sturdy and apart from being old and a bit grotty it was just what we were looking for. And it cost all of ten dollars! Not $399 or even $250 just ten. dollars. Sold!
We brought it home and gave it a clean then sanded it and after an undercoat it was looking better already. Both the fishes had to help with the painting and after three coats of white semi gloss paint it was ready for action. Mr fish took the metal springs off the base and replaced them with timber slats for a firmer base and we gave the frame a coat of silver spray paint to brighten it up.
So now little fish has a lovely new bed that can be re-painted or touched up should anything get scratched or 'decorated'.
And after we took out the change table that was hogging the space in one corner there was quite a bit of room, a lot more than we thought. I'm not sure why it didn't get the boot earlier, I'll put it down to slackness.
She insisted on wearing her singlet on the outside of her pj's, she's just that kind of gal!

Tuesday, May 17, 2011

Some new prints and some b-b-bunting!

As well as a new bedspread oldest fishes room has had some other new additions. (That's little fish on the bed, she HAD to be in the photo). This is her birthday bunting that I made for her out of assorted pink and green prints with some rainbow ricrac to hang it off. I cut two triangles out of each print and sewed them together (wrong sides facing) and pinking sheared the edges then stitched them onto the ricrac. Quick and easy and pretty.
The other new addition is a group of various prints in some white frames. I have been accumulating white frames for a while as there was a plan in place to make a display wall out of them but since deciding on a different idea for the wall they have been sitting in a box waiting for inspiration to strike.
I got a bunch of them out and played around with positioning them (using pieces of paper the same size and some blu-tac) until they looked okay and then filled them up. Having the bits of paper on the wall made it easy to position the nails/hooks/sticky things that would hold the frames up. When she came home from school and found it she was very impressed. I got bonus points for putting some mermaids in the mix.
Have you made any little decorative changes lately?

Tuesday, May 10, 2011

Soul Blossom raggy quilt is done.

Here's a bit of a squizz at oldest fishes raggy quilt that was finished recently. I started out with a soul blossom designer roll (like a jelly roll) and pondered what to do with it.
Oldest fish has now decided to be a bit girly and is getting a bit obsessed with all things pretty and pink.
Her mother is not a big fan of pink and so we reached a compromise. The walls of her room will NOT be painted pink or any shade resembling pink. She can however have some accessories and bits and pieces in her room to increase the pinkness of it.
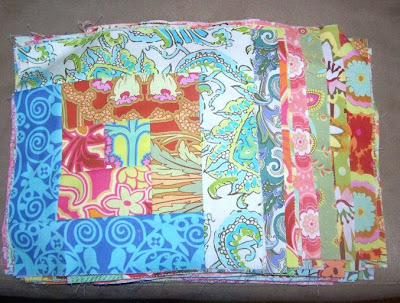
So the idea for a bed cover was born. The roll was chopped up into pieces that would be made into a very simple log cabin block. (I threw some other fabrics in to make up the number of blocks we needed). In between the log cabin blocks we put a square of printed fabric and after laying it all out and moving blocks around for a while we had a plan.
We then had to cut out the backing squares before sewing them all together. Being rather slack the raggy style of quilt rather suited this project as it was quick and easy. For anyone who hasn't made a raggy quilt before, it's pretty easy. Instead of piecing the top together first then basting your layers of wadding and backing together and quilting the whole lot, you make up your top in sections (blocks) and cut the backing blocks out the same so you can sew them as one layer, wrong sides together. The seams are left exposed on the top of the quilt as you sew one set of top/backing to the next set until you have sewn a row together. The rows are then sewn together and voila! You have a quilt! (you can put a square of wadding in between the layers if you like but since we rarely turn the fans off here it's easier to leave it out as it is not needed for warmth)
After the blocks were all sewn together I went round the edges of the quilt with a 1/2 inch seam to finish them off and stop them fraying too much. Then comes the fun bit.....
You have to get out your sharp scissors and make little snips in the seams all over the quilt and around the edges so that when it is washed (and preferably tumble dried) they look all raggy and fluffy. This takes a while and you will get sore hands if you try and do it all at once so pace yourself!
We don't have a drier so I just washed it and shook it a bit before hanging in the sun. You will get bits of thread in your machine filter (make sure you clean it out afterwards) and all over the floor if you flick it in the house so don't do that ;)
I made the sides wider than normal as I wanted it to nearly touch the floor and hide the spare mattress under her bed.
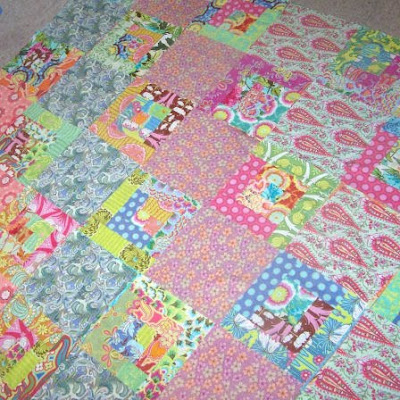
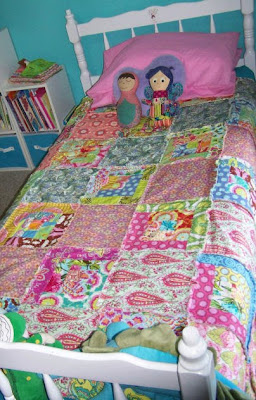
She likes it and the fact that it is pinky looking and pretty. I like it cause it was easy to make and means I don't have to look at pink walls. She got the bunting made for her birthday and now it hangs in her room to add a bit more pink and some green to the mix. Will show you a close up in the next post.
So we have used up all the soul blossoms roll now and oldest fish has a new quilt for herself.
Oh and she now has a hot pink cast on her arm. And because it's made from fibreglass she can get it wet! How awesome is that! Bath time is so much easier now.
She did really well at her hospital visit and had to get 2 xrays to check the cast was positioned correctly, walk to and from the different departments about 5 times (they are a looong way from each other) and have her old cast removed (no saw, just snippers) and the new one put on.
I am very proud of how good she was with all the things that we had to do and waiting at each department without complaining or whining, and most of all how good she was getting her cast redone. (I think the thought of a pink one helped).
She had to go back for another xray on Friday and if it's all good she will have it on for about 5 weeks.

Sunday, May 01, 2011

Whoops!

Oldest Fish has now had a turn at being in hospital. The sore arm that we thought was sprained was actually broken :(
She fell off the trampoline while it was being moved last weekend and apart from saying it was sore when she put pressure on it there was not a lot of complaining about it. She went back to school after the holidays and was okay except for falling over at lunch time and hurting it. I had to go pick her up from school the next day when they rang to say she had fallen over in PE and landed on it. So a trip to the doctor followed. Then we had a trip to the x-ray place. Then another trip to the doctor to get the results. Then a trip to the hospital to get it fixed. We should have just gone straight to the hospital and saved ourselves 4 or 5 hours of running around, will remember that for the future.
The doctors and nurses were AMAZING and I can't thank them enough. The break was just bad enough for them to discuss straightening the bones, it was borderline but they decided in the end to do it as she is only young and it was going to be pretty easy.
It all happened pretty fast once we talked to the doctor, it was all systems go!
The only traumatic thing was that she wouldn't let the doctor put the drip in to give her a sedative so they had to knock her out very quickly with an injection. That was the worst bit. Once she was knocked out they got to work and that was where I should have exited the room.
The clever nurse knew what would happen so she got me a chair and a drink of water. Then she got me a bed.
I don't think I'm a squeamish person but when it's your little fish and its all happening so fast, it's probably best not to look.
Anyways I got back up after about 10 minutes (she was in a bed about 3 meters away so the nurse was keeping me updated) and got to sit next to her while she was waking up. It's really weird watching your little one wake up from being knocked out. She was quite funny a few times and said some strange things that lightened the mood a bit.
We had to stay til she was completely okay and could get up so we were there until dinner time.
I asked the nurse who was admitting us if it was strange that she didn't really complain about being in pain considering the break she had, but apparently kids react in strange ways to pain and don't always associate the pain with the area that is affected. So I guess the lesson learned was to get anything checked out that could be serious even if the reaction is not as big as you might think it should be. Once she had a big sleep that night she was really happy the next morning and didn't remember anything from the hospital. We have to go back next week to get the temporary cast off and a new fibreglass one on. (it's going to be pink)